TextureArray用法
在使用GPU Instancing时,如果要给每个物体设置不同的贴图,直觉的想法是使用 MaterialPropertyBlock对象设置一个Texture对象数组。
类似 GPU Instancing测试 这篇里写给每个物体设置不同颜色的方式(MaterialPropertyBlock.SetVectorArray),如果有一个MaterialPropertyBlock.SetTextureArray之类的方法就完美了,
但是实际上并没有,所以需要用其他方式来实现,这时候应该让 Texture2DArray 来发挥作用。
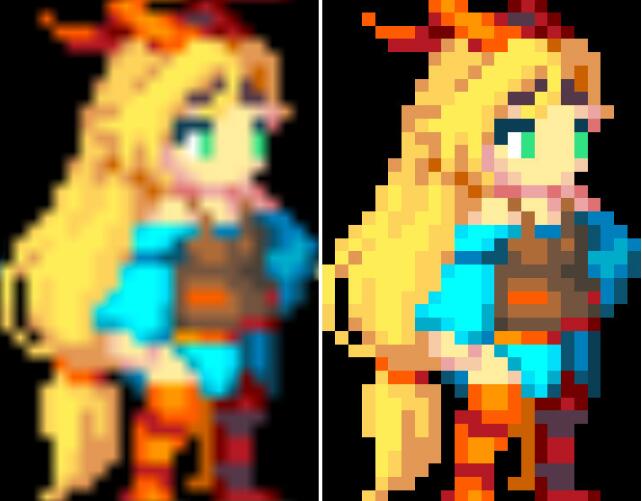
效果:每次点击按钮传递一个不同的Index到Shader,用来从Texture2DArray中读取不同的图片。

Texture2DArray 类
看名字可以大概猜到这个类的对象可以包含多个Texture2D对象,类似Texture2D对象的数组。用Texture2DArray对象来实现给每个物体一个不同的贴图的思路是:
在C#中定义一个Texture2D数组,再定义一个Texture2DArray对象,用Texture2D数组内容来初始化Texture2DArray对象。
把Texture2DArray对象作为Texture传递给Shader,通过一个索引值(_Index)来控制Shader中读取Texture2DArray对象里的那一张图。思路清晰以后就直接上代码:
using UnityEngine;
using UnityEngine.Rendering;
public class Tex2DArrayTest : MonoBehaviour
{
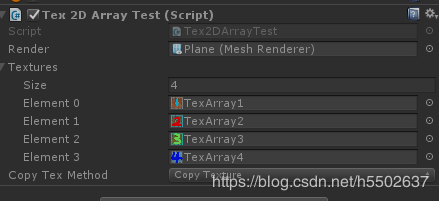
public MeshRenderer render;
public Texture2D[] textures;
public ECopyTexMethpd copyTexMethod; // 把Texrure2D信息拷贝到Texture2DArray对象中使用的方式 //
public enum ECopyTexMethpd
{
CopyTexture = 0, // 使用 Graphics.CopyTexture 方法 //
SetPexels = 1, // 使用 Texture2DArray.SetPixels 方法 //
}
private Material m_mat;
void Start()
{
if (textures == null || textures.Length == 0)
{
enabled = false;
return;
}
if (SystemInfo.copyTextureSupport == CopyTextureSupport.None ||
!SystemInfo.supports2DArrayTextures)
{
enabled = false;
return;
}
Texture2DArray texArr = new Texture2DArray(textures[0].width, textures[0].width, textures.Length, textures[0].format, false, false);
// 结论 //
// Graphics.CopyTexture耗时(单位:Tick): 5914, 8092, 6807, 5706, 5993, 5865, 6104, 5780 //
// Texture2DArray.SetPixels耗时(单位:Tick): 253608, 255041, 225135, 256947, 260036, 295523, 250641, 266044 //
// Graphics.CopyTexture 明显快于 Texture2DArray.SetPixels 方法 //
// Texture2DArray.SetPixels 方法的耗时大约是 Graphics.CopyTexture 的50倍左右 //
// Texture2DArray.SetPixels 耗时的原因是需要把像素数据从cpu传到gpu, 原文: Call Apply to actually upload the changed pixels to the graphics card //
// 而Graphics.CopyTexture只在gpu端进行操作, 原文: operates on GPU-side data exclusively //
// 考虑使用Graphics.CopyTexture来复制Texture还有一个好处是可不勾选源纹理为可读写的也行。
//using (Timer timer = new Timer(Timer.ETimerLogType.Tick))
//{
if (copyTexMethod == ECopyTexMethpd.CopyTexture)
{
for (int i = 0; i < textures.Length; i++)
{
// 以下两行都可以 //
//Graphics.CopyTexture(textures[i], 0, texArr, i);
Graphics.CopyTexture(textures[i], 0, 0, texArr, i, 0);
}
}
else if (copyTexMethod == ECopyTexMethpd.SetPexels)
{
for (int i = 0; i < textures.Length; i++)
{
// 以下两行都可以 //
//texArr.SetPixels(textures[i].GetPixels(), i);
texArr.SetPixels(textures[i].GetPixels(), i, 0);
}
texArr.Apply();
}
//}
texArr.wrapMode = TextureWrapMode.Clamp;
texArr.filterMode = FilterMode.Bilinear;
m_mat = render.material;
m_mat.SetTexture("_TexArr", texArr);
m_mat.SetFloat("_Index", Random.Range(0, textures.Length));
}
void OnGUI()
{
if (GUI.Button(new Rect(0, 0, 200, 100), "Change Texture"))
{
m_mat.SetFloat("_Index", Random.Range(0, textures.Length));
}
}
}
Shader部分:
Shader "Custom/Texture2DArray"
{
  Properties
  {
    _TexArr ("Texture Array", 2DArray) = "" {}
    _Index("Texture Array Index", Range(0,4)) = 0
  }

  SubShader
  {
    Tags { "Queue"="Geometry" "RenderType"="Opaque" }
    LOD 100

    Pass
    {
        CGPROGRAM
        #pragma vertex vert
        #pragma fragment frag
        #include "UnityCG.cginc"

        // 会提示警告: Unrecognized #pragma directive: require at line 24
        // #pragma require 2darray

        UNITY_DECLARE_TEX2DARRAY(_TexArr);
        int _Index;

        struct appdata
        {
            float4 vertex : POSITION;
            float3 uv : TEXCOORD0;
        };

        struct v2f
        {
            float4 pos : SV_POSITION;
            float3 uv : TEXCOORD0;
        };

        v2f vert (appdata v)
        {
            v2f o;
            o.pos = UnityObjectToClipPos(v.vertex);
            o.uv = v.uv;
            return o;
        }

        fixed4 frag (v2f i) : SV_Target
        {
            return UNITY_SAMPLE_TEX2DARRAY(_TexArr, float3(i.uv.xy, _Index));
        }
        ENDCG
    }
  }

  Fallback Off
}
OpenGL中使用TextureArray
关于TextureArray的介绍,参考官网。这里简单介绍下其用法,在c++中绑定TextureArray
// texture object and texture 2d array
glGenTextures(2, textures);
glBindTexture(GL_TEXTURE_2D_ARRAY, textures[0]);
//allocate memory: depth is the length of texture 2d array
glTexStorage3D(GL_TEXTURE_2D_ARRAY, 1, GL_RGBA8, 100, 100, 100);
//wrap & filter
glTexParameteri(GL_TEXTURE_2D_ARRAY, GL_TEXTURE_WRAP_S, GL_CLAMP_TO_EDGE);
glTexParameteri(GL_TEXTURE_2D_ARRAY, GL_TEXTURE_WRAP_T, GL_CLAMP_TO_EDGE);
glTexParameteri(GL_TEXTURE_2D_ARRAY, GL_TEXTURE_MIN_FILTER, GL_LINEAR);
glTexParameteri(GL_TEXTURE_2D_ARRAY, GL_TEXTURE_MAG_FILTER, GL_LINEAR);
glsl中采样颜色,需要定义2darray的sampler,然后还是调用texture函数,但是第二个参数需要三维的纹理坐标,z值代表在第几张纹理上面取值,从 0 开始。
precision mediump sampler2DArray;
uniform sampler2DArray texture_array;

color = texture(texture_array, vec3(fs_in.uv, layer));
TextureArray在使用的时候只需要绑定一次,就可以采样多个2D Texture。采样的时候还是一次只能采样一个指定的slice,blend也需要另外的Shader代码来完成。
需要注意的地方有:
一. Texture2DArray使用的图片需要保证大小相同,格式一致,并且开启了 read/write enabled 选项。
二. Graphics.CopyTexture和Texture2DArray.SetPixels,这两种方法都可以把图像信息传给Texture2DArray对象的每一个子Texture2D。
整体上Graphics.CopyTexture 方法要比 Texture2DArray.SetPixels 快的多,大概是40到50倍的样子,原因大概是 Graphics.CopyTexture 只在GPU端进行操作,而Texture2DArray.SetPixels在CPU端操作,操作结束后需要调用Apply方法把图片数据传给GPU,所以比较耗时,Texture2DArray.Apply文档 中也建议如果不需要在CPU上读取像素信息的话建议使用更快的 Graphics.CopyTexture 方法。
三. 从文档(https://docs.unity3d.com/Manual/SL-TextureArrays.html)上来看,GLES3 Metal 已经可以支持了。最容易想到的就是地形的splat层,如果是四层splat,那么就可以用一个Texture2DArray来代替,好处是减少了bind消耗(glBindTexture)。如果单从性能上看,Texture2DArray比Texture2D的确只是减少纹理绑定的开销,然后在游戏引擎中可能会对合批产生影响。bind texture对于api是非常费cpu的操作。 有了texture array,一个绑定操作就可以了。对于dx12 或者 Vulkan。没有绑定texture的概念。一个texture 已经很像cpu的一个内存指针。想用多少都可以。
四. 更多关于Texture2DArray的性能开销和测试, 可以参考uwa的分析。
采样器 sampler
多数时候当在shader中采样纹理时,纹理的采样状态都将来自texture settings 纹理设置,本质上,纹理与采样器都是成对使用的。这些在使用DX9风格的语法都是默认的行为。
sampler2D _MainTex;
// ...
half4 color = tex2D(_MainTex, uv);
使用了sampler2D,sampler3D,samplerCUBE HLSL的关键字来定义纹理与采样器。
多数时候这都是你想要的结果,并且这在老旧的图形API(OpenGL ES)都是唯一支持的选项。
Separate textures and samplers
将纹理与采样器分离
许多图形API和GPU允许使用比纹理更少的采样器,而耦合的纹理+采样器语法可能不允许编写更复杂的着色器。例如Direct3D 11允许你在一个单独的shader中使用最多128个纹理,但采样器最多只有16个。
Unity允许定义纹理和采样器,使用DX11风格的HLSL语法,和使用一个特殊的命名规则来匹配使用:采样器的名字以”sampler” + 纹理名称的形式规则,将会从纹理得到采样状态。
上面的shader代码都可以使用DX11风格的HLSL语法来重写,它们的效果是一样的:
Texture2D _MainTex;
SamplerState sampler_MainTex; // "sampler" + “_MainTex”
// ...
half4 color = _MainTex.Sample(sampler_MainTex, uv);
然而,这种方式的shader,当需要采样的纹理不止一个的时候,可以写成从其他纹理中复用的采样器。下面的例子中,有三个纹理需要采样,但仅仅只有一个采样器使用就可以了:
Texture2D _MainTex;
Texture2D _SecondTex;
Texture2D _ThirdTex;
SamplerState sampler_MainTex; // "sampler" + “_MainTex”
// ...
half4 color = _MainTex.Sample(sampler_MainTex, uv);
color += _SecondTex.Sample(sampler_MainTex, uv);
color += _ThirdTex.Sample(sampler_MainTex, uv);
需要注意的是DX11风格的HLSL语法在一个老旧的平台上是不工作的(如:OpenGL ES 2.0),查看 shading language了解详情。你可以使用 #pragma target 3.5(查看 shader compilation targets 了解pragma target详情)来让该shader跳过老旧平台的支持。
Unity提供一些shader宏来帮助定义采样纹理,使用这种”separate samplers”(纹理与采样器分离)方法,查看 built-in macros。上面的例子可以重写为,使用宏的方式:
UNITY_DECLARE_TEX2D(_MainTex);
UNITY_DECLARE_TEX2D_NOSAMPLER(_SecondTex);
UNITY_DECLARE_TEX2D_NOSAMPLER(_ThirdTex);
// ...
half4 color = UNITY_SAMPLE_TEX2D(_MainTex, uv);
color += UNITY_SAMPLE_TEX2D_SAMPLER(_SecondTex, _MainTex, uv);
color += UNITY_SAMPLE_TEX2D_SAMPLER(_ThirdTex, _MainTex, uv);
上面的代码可以在Unity支持的所有平台上编译,但是在像DX9这样的老平台上将会回退到使用三个采样器的方式。
Inline sampler state
内联的采样器状态
除了将HLSL SamplerState对象命名为“sampler”+TextureName之外,Unity还可以识别采样器名称中的其他一些模式。这对于直接在着色器中声明定义简单的硬编码采样状态来说是非常有用。例如:
Texture2D _MainTex;
SamplerState my_point_clamp_sampler;
// ...
half4 color = _MainTex.Sample(my_point_clamp_sampler, uv);
名为”my_point_clamp_sampler”将会被识别为一个使用纹理点(最近的点)filter(滤波),与纹理wrap模型为Clamp的采样器。
采样器的名称被识别为”inline”(内联)的采样器状态(大小写不敏感的):
- Point, Linear 或 Trilinear(必要项)设置纹理的filter过滤模型。
- Clamp, Repeat, Mirror 或 MirrorOnce(必要项)设置纹理的wrap模型。
Wrap模式可以指定没轴向的模式(UVW),例如:ClampU_RepeatV,将指定U坐标使用Clamp,V坐标使用Repeat - Compare (可选项)设置采样的深度比较;使用HLSL SamplerComparisonState 类型和 SampleCmp 或 SampleCmpLevelZero 函数
这儿有个采样纹理的例子:分别使用 sampler_linear_repeat 和 sampler_point_repeat,下面的图片,就是对应名称如何控制过滤模式:
这儿还有一个例子,分别使用 SmpClampPoint,SmpRepeatPoint,SmpMirrorPoint,SmpMirrorOncePoint,Smp_ClampU_RepeatV_Point 的采样器状态,下面展示如何控制wrap模式的。在最后的那个例子中,使用了水平u,和垂直v轴向都不一样的wrap模式。在这些例子中纹理坐标都是使用-2.0到+2.0
就像分开 texture + sampler(纹理 + 采样器)的语法一样,内联的采样器状态在某些平台不支持。当前它们在Direct3D 11/12,PS4,XboxOne 和 Metal都支持。
注意 “MirrorOnce” 纹理的Wrap模式在多数的移动设备的GPU/API都不知道,当它不支持的时候将会回退使用Mirror模式。
参考链接:
https://www.reddit.com/r/Unity3D/gpu_instancing_texture2darray
https://forum.unity.com/threads/instance-of-texture
https://docs.unity3d.com/Manual/SL-TextureArrays
https://docs.unity3d.com/ScriptReference/Texture2DArray
https://docs.unity3d.com/ScriptReference/Graphics.CopyTexture
https://blog.csdn.net/aa20274270
https://www.cnblogs.com/hont