TDBR & Xcode Profile
为了体现显式的、高性能的、贴近硬件的设计哲学,现代图形 API 都提供了相对传统 API 更加强大的内存管理接口。传统 API 的内存管理基本是通过 Runtime/Driver 代为托管,开发者一般不需要过多关心内存分配实现和细节。现代 API 提供了明确的内存控制接口,因此 Runtime/Driver 几乎不再帮助开发者管理内存,需要开发者显式控制内存分配。显式内存管理的好处在于可以降低内存分配的次数开销,而不必每次创建/销毁资源时进行内存分配操作。
GPU架构
GPU也是有多级缓存结构的:寄存器、L1缓存、L2缓存、GPU显存、系统内存。它们的访问周期对应下表,我们可以看到,直接访问寄存器其实是最快的,接下来就依次是L1, L2缓存,系统内存之类的。
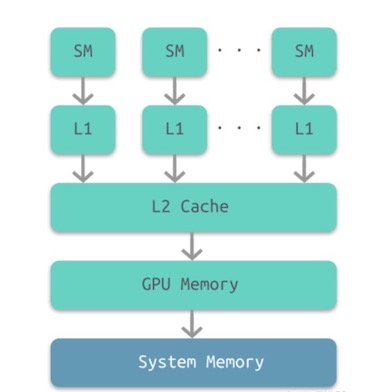
可以看出来GPU也是有多级缓存结构的:寄存器、L1缓存、L2缓存、GPU显存、系统内存。它们的访问周期对应下表,我们可以看到,直接访问寄存器其实是最快的,接下来就依次是L1, L2缓存,系统内存之类的。
| 储存类型 | 寄存器 | 共享内存 | L1缓存 | L2缓存 | 纹理/常量缓存 | 全局内存 |
|---|---|---|---|---|---|---|
| 访问周期 | 1 | 1~32 | 1~32 | 32~64 | 400~600 | 400~600 |
这里涉及到一个概念,那就是On-Chip Memory,也有人叫TiledMemory。 可以理解为之前提到的L1和L2缓存,也就是上图中间的灰色部分,我们知道,L1和L2缓存都是很昂贵的设备,所以基本上都很小,所以TBR就利用了这个特点来做了渲染。
对于TBR来讲,整个光栅化和像素处理会被分为一个个Tile进行处理,通常为16×16大小的Tile。TBR的结构通过On-Chip Buffers来储存Tiling后的Depth Buffer和Color buffer。
也就是原先IMR架构中对主存中Color/Depth Buffer进行的读写操作变成直接在GPU中的高速内存操作,减少了最影响性能的系统内存传输的开销。通过下面这张图能够更好的来理解,下图的DRAM在手机上就是物理内存那一块。
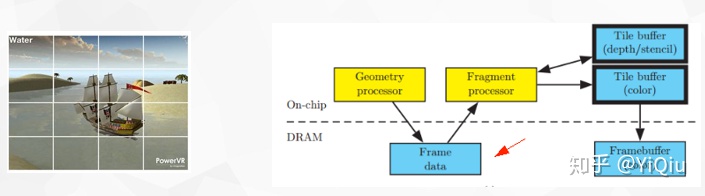
在TBR的架构里,并不是来一个绘制就执行一个的,因为任何一个绘制都可能影响到到整个FrameBuffer,如果来一个画一个,那么GPU可能会在每一个绘制上都来回运输所有的Tile,这太慢了。
所以TBR一般的实现策略是对于Cpu过来的绘制,只对他们做顶点处理,也就是上图中的Geometry Processor部分,产生的结果(Frame Data)暂时写回到物理内存,等到非得刷新整个FrameBuffer的时候,比如说在代码里显示的执行GLFlush,GLFinish,Bind和Unbind FrameBuffer这类操作的时候,总之就是我告诉GPU现在我就需要用到FrameBuffer上数据的时候,GPU才知道拖不了了,就会将这批绘制做光栅化,做tile-based-rendering。
TDBR 渲染流程
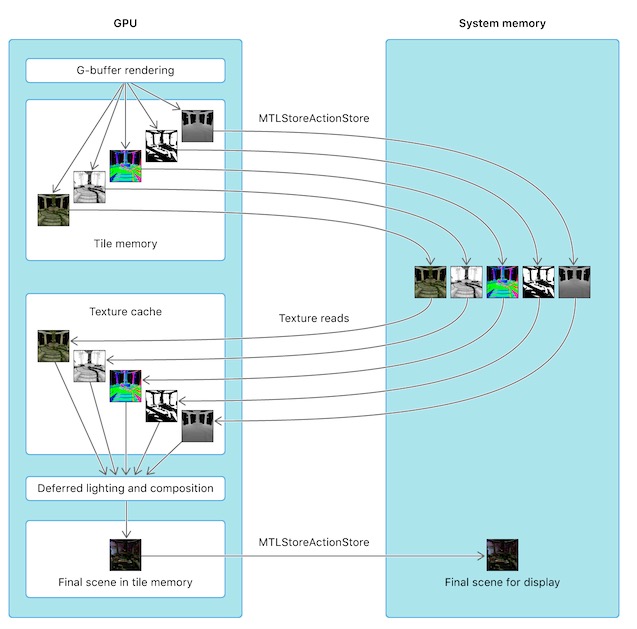
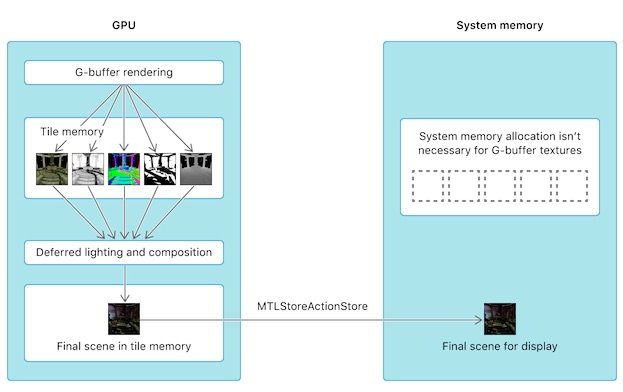
基于TBDR的GPU架构,延时渲染可以实现将渲染出的G-buffer保存在tile memory中,不需要再写入到system memory中,就避免了将G-buffer从GPU写入到CPU然后第二个Pass GPU又从CPU读取G-buffer的步骤,降低了CPU和GPU之间的带宽消耗。
iOS和tvOS GPU具有基于图块的延迟渲染(TBDR)架构,允许它们将数据渲染到GPU内的tile内存。通过渲染到tile内存,该设备避免了GPU和系统存储器之间潜在的昂贵的往返(通过带宽受限的存储器总线)。
Metal中我们控制GPU是否将tile memory中的贴图数据写入到CPU的system memory的方式是配置我们的renderCommandEncoder的storeAction和texture贴图的storageMode。
- loadAction是用来配置渲染开始时是否清空我们的RT等动作。
- storeAction是用来配置渲染结束是否将render pass的结果保存到attachment中等动作。
typedef NS_ENUM(NSUInteger, MTLLoadAction) {
    MTLLoadActionDontCare = 0,
    MTLLoadActionLoad = 1,
    MTLLoadActionClear = 2,
} API_AVAILABLE(macos(10.11), ios(8.0));

typedef NS_ENUM(NSUInteger, MTLStoreAction) {
    MTLStoreActionDontCare = 0,
    MTLStoreActionStore = 1,
    MTLStoreActionMultisampleResolve = 2,
    MTLStoreActionStoreAndMultisampleResolve API_AVAILABLE(macos(10.12), ios(10.0)) = 3,
    MTLStoreActionUnknown API_AVAILABLE(macos(10.12), ios(10.0)) = 4,
    MTLStoreActionCustomSampleDepthStore API_AVAILABLE(macos(10.13), ios(11.0)) = 5,
} API_AVAILABLE(macos(10.11), ios(8.0));
几种常用storgeMode的含义:
- MTLStorageModeShared,CPU 填充更新,CPU 和 GPU 都可访,这也是默认的存储模式。
- MTLStorageModePrivate,仅 GPU访问,常用于渲染目标,中间资源或纹理流。
- MTLStorageModeShared,CPU填充一次,GPU频繁访问。使用这个模式资源填充内容,然后将资源内容通过 GPU 复制到使用 MTLStorageModePrivate 模式的另一个资源中。
- MTLStorageModeMemoryless,仅由GPU访问,其内容是临时的(仅纹理),这种类型资源的数据不存储在系统内存中,而是存储在 GPU 内部的 Tile Memory 中(如上图所示),相比系统内存,Tile Memory 具有更高的带宽、更低的延迟和更低的功耗。比较适合创建在渲染过程中不需要 GPU/CPU 访问而使用的临时资源,比如 Depth/Stencil Target,可以节省大量的系统内存。
/*!
 @enum MTLStorageMode
 @abstract Describes location and CPU mapping of MTLTexture.
 @constant MTLStorageModeShared
 In this mode, CPU and device will nominally both use the same underlying memory when accessing the contents of the texture resource.
 However, coherency is only guaranteed at command buffer boundaries to minimize the required flushing of CPU and GPU caches.
 This is the default storage mode for iOS Textures.

 @constant MTLStorageModeManaged
 This mode relaxes the coherency requirements and requires that the developer make explicit requests to maintain
 coherency between a CPU and GPU version of the texture resource.  In order for CPU to access up to date GPU results,
 first, a blit synchronizations must be completed (see synchronize methods of MTLBlitCommandEncoder).
 Blit overhead is only incurred if GPU has modified the resource.
 This is the default storage mode for OS X Textures.

 @constant MTLStorageModePrivate
 This mode allows the texture resource data to be kept entirely to GPU (or driver) private memory that will never be accessed by the CPU directly, so no
 conherency of any kind must be maintained.

 @constant MTLStorageModeMemoryless
 This mode allows creation of resources that do not have a GPU or CPU memory backing, but do have on-chip storage for TBDR
 devices. The contents of the on-chip storage is undefined and does not persist, but its configuration is controlled by the
 MTLTexture descriptor. Textures created with MTLStorageModeMemoryless dont have an IOAccelResource at any point in their
 lifetime. The only way to populate such resource is to perform rendering operations on it. Blit operations are disallowed.
*/
typedef NS_ENUM(NSUInteger, MTLStorageMode)
{
    MTLStorageModeShared  = 0,
    MTLStorageModeManaged API_AVAILABLE(macos(10.11), macCatalyst(13.0)) API_UNAVAILABLE(ios) = 1,
    MTLStorageModePrivate = 2,
    MTLStorageModeMemoryless API_AVAILABLE(macos(11.0), macCatalyst(14.0), ios(10.0)) = 3,
} API_AVAILABLE(macos(10.11), ios(9.0));
若将storeAction设置为MTLStoreActionStore, 表示RT的结果会从GPU的tile memory写入到CPU的system memory,即在system memory中保存RT的备份。如果渲染后期还需要用到system memory中备份的RT,就需要从system memory中读取备份的RT到GPU的贴图缓存中。所以传统的双Pass延迟渲染中需要在第一个Pass和第二个Pass期间将G-buffer保存到system memory中。
descriptor.colorAttachments[0].storeAction = MTLStoreActionStore;
GBufferTextureDesc.storageMode = MTLStorageModePrivate;
若不希望GPU再把G-buffer保存到system memory,因此Metal中我们可以设置textures的storageMode为MTLStorageModeMemoryless即可,storeAction的值可以设为MTLStoreActionDontCare。
descriptor.colorAttachments[0].storeAction = MTLStoreActionDontCare;
GBufferTextureDesc.storageMode = MTLStorageModeMemoryless;
在unity的URP渲染管线中或者通过CommandBuffer接口,可以通过如下接口设置:
RenderTextureDescriptor descriptor = new RenderTextureDescriptor(width, height);
descriptor.graphicsFormat = s_RenderTextureFormatToUse;
descriptor.depthBufferBits = 0;
descriptor.msaaSamples = 1;
descriptor.dimension = TextureDimension.Tex2D;
descriptor.memoryless = RenderTextureMemoryless.MSAA;
// RenderTargetIdentifier buffer
cmd.SetRenderTarget(buffer, loadAction, storeAction);
通过定义storeAction 可以设置回写到RAM
public enum RenderBufferStoreAction
{
/// <summary>
/// The RenderBuffer contents need to be stored to RAM. If the surface has MSAA enabled, this stores the non-resolved surface
/// </summary>
Store,
/// <summary>
///Resolve the (MSAA'd) surface. Currently only used with the RenderPass API.
/// </summary>
Resolve,
/// <summary>
/// Resolve the (MSAA'd) surface, but also store the multisampled version. Currently only used with the RenderPass API
/// </summary>
StoreAndResolve,
/// <summary>
/// The contents of the RenderBuffer are not needed and can be discarded. Tile-based GPUs will skip writing out the surface contents altogether, providing performance boost
/// </summary>
DontCare,
}
通过unity生成xcode的工程,搜遍整个项目的storageMode引用,发现只对深度缓冲中的 storageMode 在ios和tvOS平台会根据c#中的RenderTextureDescriptor的memoryless来设置值。 在OSX平台默认还是MTLResourceStorageModePrivate|MTLResourceCPUCacheModeDefaultCache。
MTLTextureDescriptor* depthTexDesc = [MTLTextureDescriptorClass texture2DDescriptorWithPixelFormat: pixelFormat width: surface->targetW height: surface->targetH mipmapped: NO];
#if PLATFORM_OSX
    depthTexDesc.resourceOptions = MTLResourceCPUCacheModeDefaultCache | MTLResourceStorageModePrivate;
#endif

#if PLATFORM_IOS || PLATFORM_TVOS
    if (surface->memorylessDepth)
        depthTexDesc.storageMode = MTLStorageModeMemoryless;
#endif

depthTexDesc.usage = MTLTextureUsageRenderTarget | MTLTextureUsageShaderRead;
if (surface->msaaSamples > 1)
{
    depthTexDesc.textureType = MTLTextureType2DMultisample;
    depthTexDesc.sampleCount = surface->msaaSamples;
    if (![surface->device supportsTextureSampleCount: depthTexDesc.sampleCount])
        depthTexDesc.sampleCount = 4;
}
上述代码来自unity生成的xcode项目MetalHelper.mm
注意:
在Tile based shading中,G-buffer是被分成tile-size大小来保存的,因此可以将所有物体一次性渲染到tile-sized G-buffer中留在On-Chip memory。要注意并不是仅仅G-buffer不保存到system memory那么简单,实现的前提是Tile based,否则On-Chip memory是无法装得下完整的屏幕大小的G-buffer的。Tile based是由于移动平台计算性能有限应运而生的GPU架构。
事实上Metal并没有提供显式的方法去启用Tile Based,而是根据某些场景的代码实现和设置提示GPU启用tile memory的。例如有两种启用的情况如下:
-
一个是上面我们提到的Load and Store Action和storgeMode的设置,当我们设置RT不保存到system memory并且只给GPU访问的时候,不需要我们手动dispatch线程组,GPU就会启用Tile Based将RT切成tile size大小保存在tile memory进行快速处理。这就是单pass延迟渲染启用Tile base的方法;
-
另外一种情况就是Tile Based Shading,这种情况其实是有显式的启用方法的,会有一个专门的描述RenderPipelineState的MTLTileRenderPipelineDescriptor,可以指定采样规模和tileFunction等
MTLTileRenderPipelineDescriptor *tileDescriptor = [MTLTileRenderPipelineDescriptor new];
id <MTLFunction> lightCullingKernel = [defaultLibrary newFunctionWithName:@"cull_lights"];
tileDescriptor.tileFunction = lightCullingKernel;
tileDescriptor.label = @"Light Culling";
tileDescriptor.rasterSampleCount = AAPLNumSamples;
tileDescriptor.colorAttachments[AAPLRenderTargetLighting].pixelFormat = view.colorPixelFormat;
tileDescriptor.colorAttachments[AAPLRenderTargetDepth].pixelFormat = AAPLDepthDataPixelFormat;
tileDescriptor.threadgroupSizeMatchesTileSize = YES;
lightCullingPipelineState = [_device newRenderPipelineStateWithTileDescriptor:tileDescriptor
                                options:0 reflection:nil error:&error];

NSAssert(_lightCullingPipelineState, @"Failed to create pipeline state: %@", error);
显式启用tile shader的方式是dispatch线程组,指定每个tile上的线程组规模,进行计算。同时可以在tile memory上设置buffer数据或者threadgroup memory数据等:
[encoder setRenderPipelineState:lightCullingPipelineState];
[encoder setThreadgroupMemoryLength:AAPLThreadgroupBufferSize offset:0 atIndex:AAPLThreadgroupBufferIndexLightList];
[encoder setThreadgroupMemoryLength:AAPLTileDataSize offset:AAPLThreadgroupBufferSize atIndex:AAPLThreadgroupBufferIndexTileData];
[encoder setTileBuffer:_uniformBuffers[currentBufferIndex] offset:0 atIndex:AAPLBufferIndexUniforms];
[encoder setTileBuffer:_lightEyePositions[currentBufferIndex] offset:0 atIndex:AAPLBufferIndexLightsPosition];
[encoder dispatchThreadsPerTile:MTLSizeMake(AAPLTileWidth,AAPLTileHeight,1)];
上述代码中, cull_lights是shader中定义的核函数, 形式如下:
/// Culls each light's volume against the top, bottom, left, right, near and far planes of the tile.
kernel void cull_lights(imageblock<ColorData,imageblock_layout_implicit> imageBlock,
                        constant AAPLUniforms &uniforms       [[ buffer(AAPLBufferIndexUniforms) ]],
                        device vector_float4 *light_positions [[ buffer(AAPLBufferIndexLightsPosition)]],
                        threadgroup int *visible_lights       [[ threadgroup(AAPLThreadgroupBufferIndexLightList)]],
                        threadgroup TileData *tile_data       [[ threadgroup(AAPLThreadgroupBufferIndexTileData)]],
                        ushort2 threadgroup_size              [[ threads_per_threadgroup ]],
                        ushort2 threadgroup_id                [[ threadgroup_position_in_grid ]],
                        uint thread_linear_id                 [[ thread_index_in_threadgroup]])
{
    uint threadgroup_linear_size = threadgroup_size.x*threadgroup_size.y;

    // Initialize the tile light count to zero.
    if (thread_linear_id == 0)
    {
        atomic_store_explicit(&tile_data->numLights, 0, memory_order_relaxed);
    }
}
UWA 优化建议
-
若先在RenderTexture A绘制了一个三角形,然后在RenderTexture B绘制任意一个东西,再然后想继续往RenderTexture A绘制东西,但是要求是A上的那个三角形还要在,那么就需要RenderBufferLoadAction.Load。这个操作会导致RenderTexture A需要从local memory复制到tile memory,这样就多了一倍的带宽。带宽是移动游戏发热的根本原因。
-
在一个刚申请出来的RenderTexture A绘制一个三角形,那么就需要RenderBufferLoadAction.Clear。否则,谁都不知道刚申请出来的这个RenderTexture是什么样子,所以需要Clear一下。Clear操作只是给这个RenderTexture打个标记,虽然有代价,但是比较小。
-
在一个刚申请出来的RenderTexture A绘制一个三角形,但是你自己知道,你绘制的这个三角形是全屏的,会覆盖满整个屏幕,这个时候就不需要Clear了,直接RenderBufferLoadAction.DontCare。这样毫无代价,效果也完全没问题。
-
若RenderTexture A作为Color RenderTexture,RenderTexture D作为Depth RenderTexture,绘制两个有前后顺序的三角形。然后,你将RenderTexture A blit到RenderTexture B上,这个时候,要对RenderTexture A设置为RenderBufferStoreAction.Store,对RenderTexture D设置为RenderBufferStoreAction.DontCare。这个操作,RenderTexture A会从tile memory复制到local memory,而RenderTexture D则会直接被抛弃,不会产生额外的带宽。当然这个操作还有个前提,RenderTexture D被通过的RenderTextureMemoryless.Depth设置为memoryless。
Xcode设置
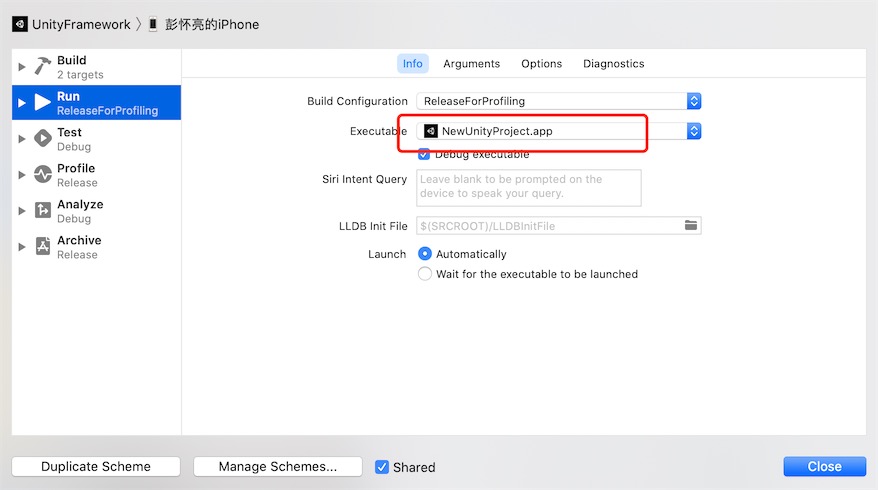
Unity升级到2019.3之后的版本,IL转换的c++代码, 单独输出到UnityFramework,不能直接断点调试了, 需要在Scheme的UnityFramework选项中做如下设置,才能断点成功。
在xcode中:Product -> Scheme -> Edit Scheme -> Run -> Options 下,设置Metal API Validation为Enabled获取详细的调试数据:
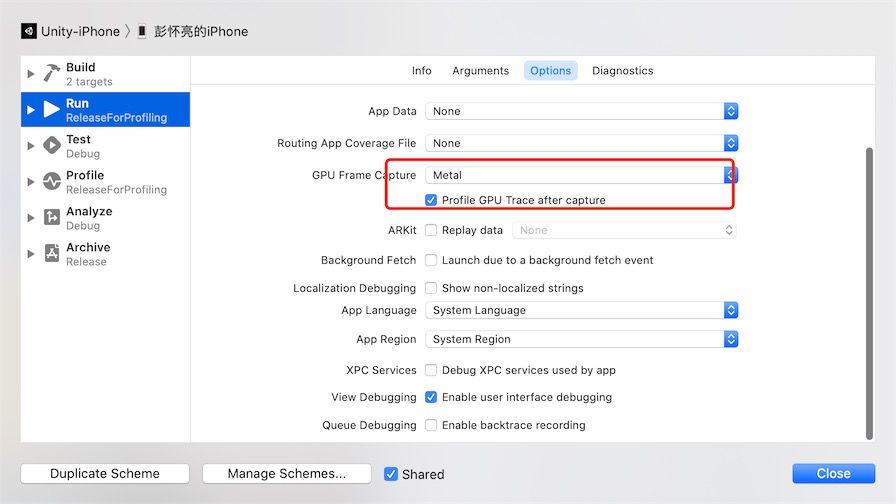
设置好之后, xcode中点击Debug->CaptureGPUFrame, 经过xcode处理一段时间之后,可以得到下图的结果。或者点击Capture Frame按钮截取一帧进行数据分析:

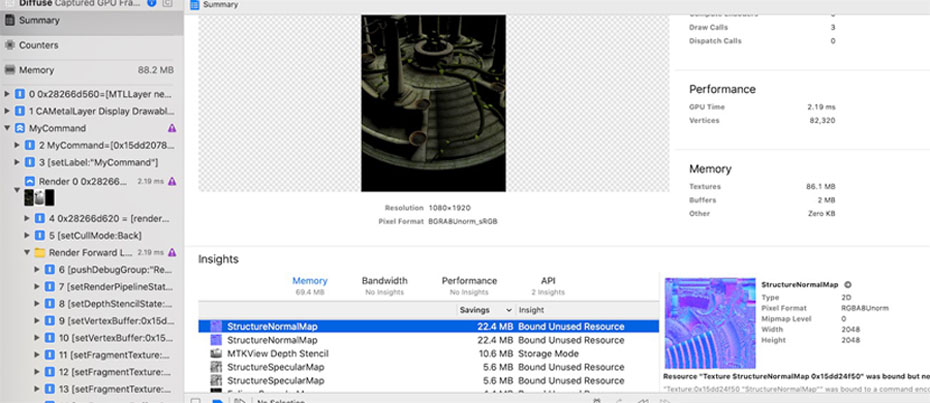
点击左上角Summary, 可以进程上下文引用的以及生成的贴图信息(大小、格式、Mipmap、采样数)
然后点击左上角第二个页签Counters, 可以下图展示区域:
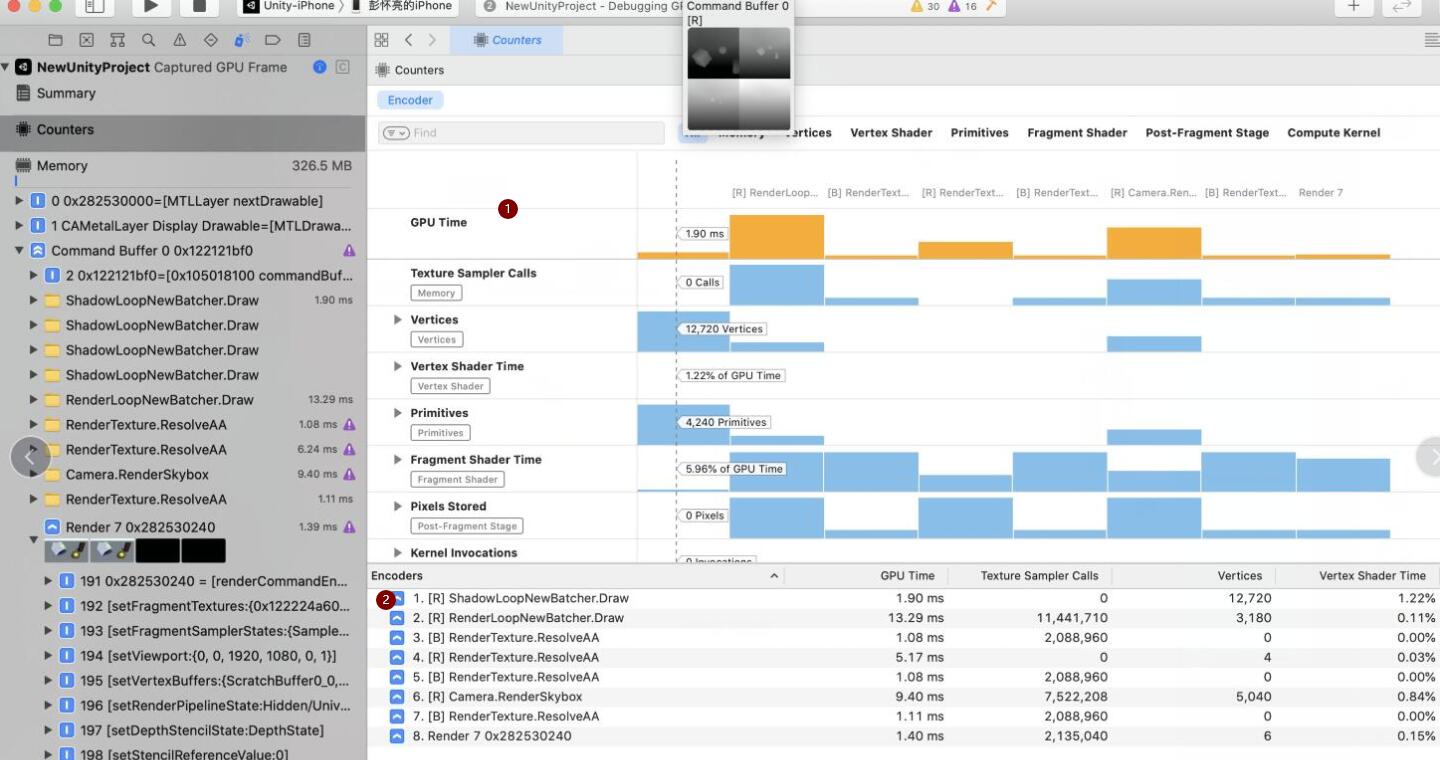
可以看到右下角区域Encoders, 列出了和Unity Debuger的对应的URP渲染管线,通过对比发现,xcode里可以看到更多对应的API和过程。
同时可以看到右上角的时间线,横向表示渲染管线每个PASS绘制顺序, 纵向代表每个PASS 内部渲染流程(顶点变换/片元着色) 每个块显示着对应的执行时间,Attachment预览,三角数量。
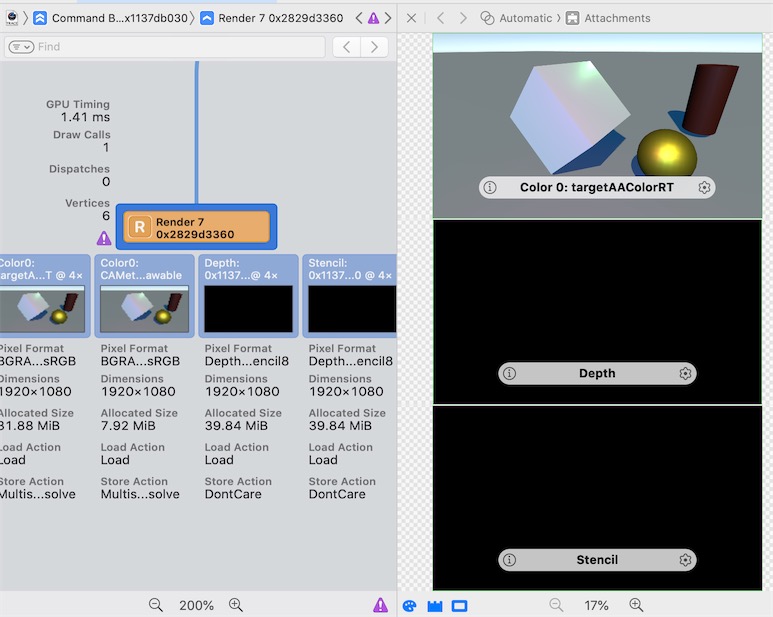
点击CommandBuffer选项, 可以查看每个PASS输出的Attachment,包含深度、颜色、模板缓冲
Capture 获取到渲染的流程图
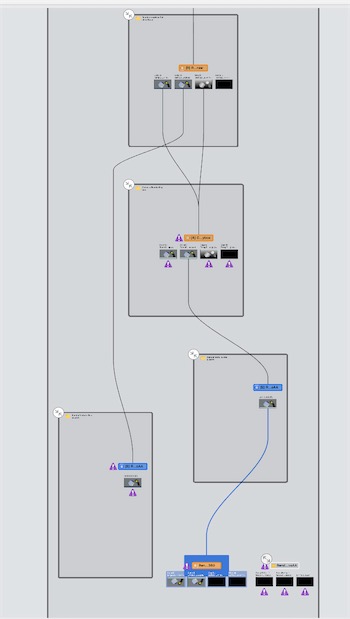
从这里看一看出, 渲染到最后GBuffer的图像,除了UnityDebuger那样一个个Pass自上而下渲染过程, 还可以看到一些并行的过程,比如说对开启MSAA之后ReolveAA的过程。
查看显存中所有的贴图资源
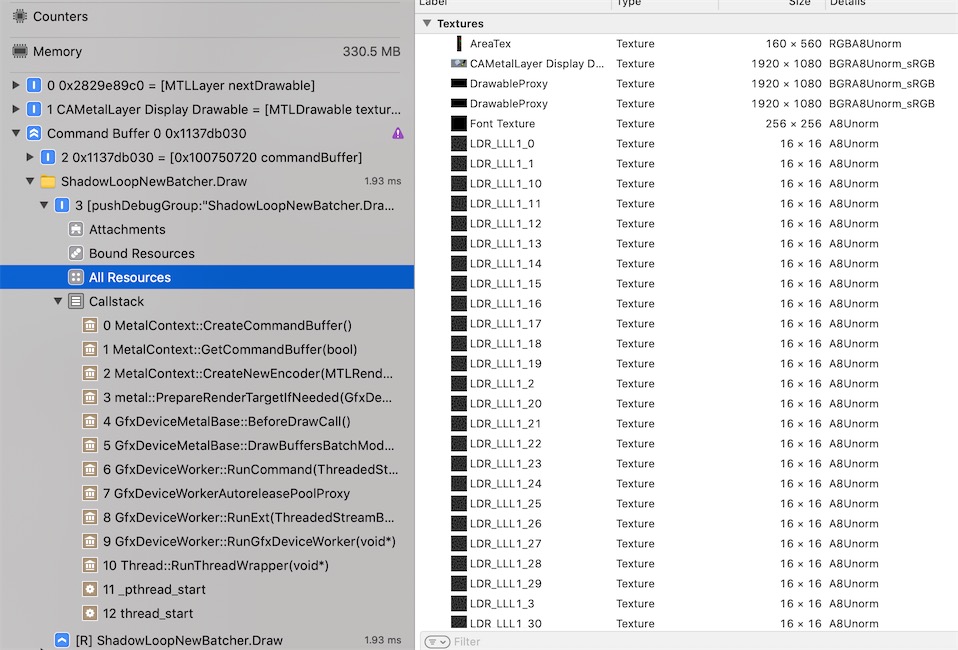
和Unity的FrameDebug窗口相比较,可以看到xcode除了URP的定义的pass, 还能看到流程绘制的并行情况, 以及pass输出之后Attachment(也包含颜色、深度、模板缓冲)的LoadAction、StoreAction、Format 以及Texture在显存里的开销。
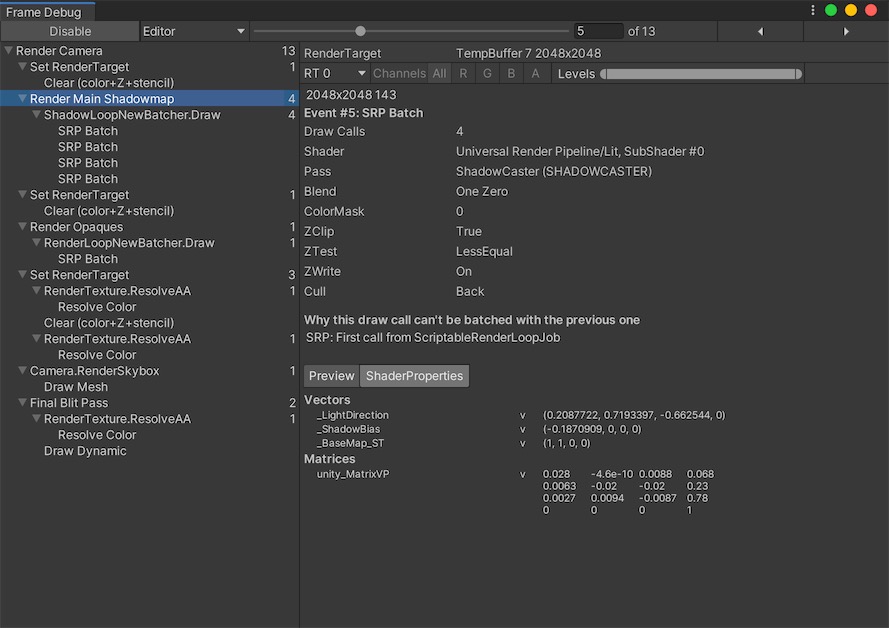
然而Unity的Debuger中也可以更方便的切换Batcher绘制流程,以及Shader输入的参数(包含前面pass的输出RT以及CPU端计算得来矩阵),二者结合起来使用才会使调试变得得心顺手。
查看编译Shader
点击图中导航栏, 可以切换到Shader, 这里是引擎转换好的shader代码:
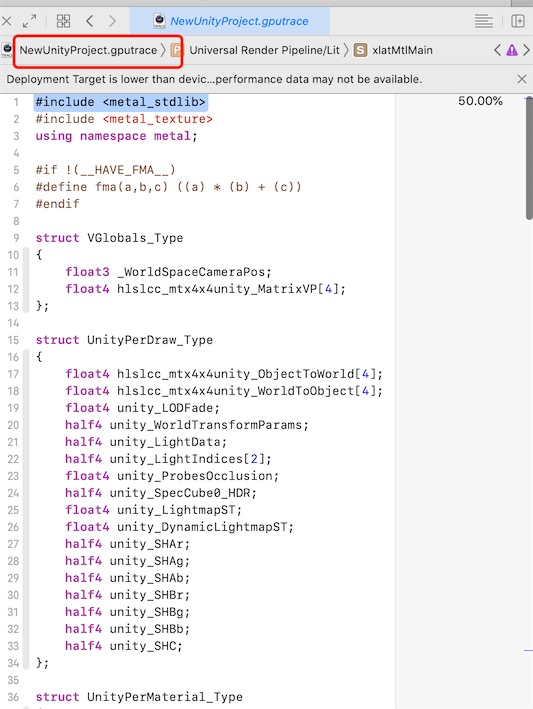
遗憾的是, xcode不支持像Nvidia Nsight那样对shader每行进行断点调试。
以编程方式执行GPU捕获
命令缓冲区和命令编码器提供以下方法,使您可以轻松识别应用程序中特定的Metal命令组:
- MTLCommandBuffer pushDebugGroup, popDebugGroup
- MTLCommandEncoder pushDebugGroup, popDebugGroup, insertDebugSignpost
使用这些方法可以简化应用程序开发过程,尤其是对于每个缓冲区或编码器使用许多Metal命令的任务。
Debug组被推送并弹出到仅在其关联的MTLCommandBuffer或MTLCommandEncoder的生命周期内存在的唯一堆栈上。 您可以通过将多个组推入堆栈来嵌套调试组,然后从堆栈中弹出以前的组。
id<MTLRenderCommandEncoder> encoder = [commandBuffer renderCommandEncoderWithDescriptor:renderPassDescriptor];
encoder.label = @"My Render Encoder";
[encoder pushDebugGroup:@"My Render Pass"];

    [encoder pushDebugGroup:@"Pipeline Setup"];
    // Render pipeline commands
    [encoder popDebugGroup]; // Pops "Pipeline Setup"

    [encoder pushDebugGroup:@"Vertex Setup"];
    // Vertex function commands
    [encoder popDebugGroup]; // Pops "Vertex Setup"

    [encoder pushDebugGroup:@"Fragment Setup"];
    // Fragment function commands
    [encoder popDebugGroup]; // Pops "Fragment Setup"

    [encoder pushDebugGroup:@"Draw Calls"];
    // Drawing commands
    [encoder popDebugGroup]; // Pops "Draw Calls"

[encoder popDebugGroup]; // Pops "My Render Pass"
[encoder endEncoding];
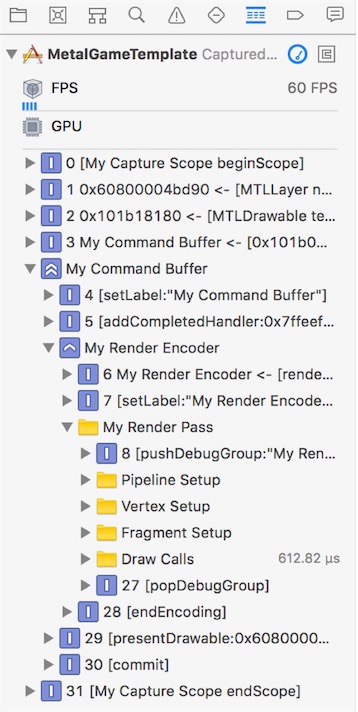
执行GPU捕获后调试组在Xcode的调试导航器中的显示方式, 得到下面实例:
Capture a Device or Command Queue - 捕获设备或命令队列
开始捕获特定MTLDevice或MTLCommandQueue的命令,请调用startCaptureWithDevice:或startCaptureWithCommandQueue:方法。 要停止捕获命令,请调用stopCapture方法。
- (void)triggerProgrammaticCapture
{
    [[MTLCaptureManager sharedCaptureManager] startCaptureWithDevice:_device];
}

- (void)runMetalCommands
{
    id<MTLCommandBuffer> commandBuffer = [commandQueue commandBuffer];
    // Do Metal work
    [commandBuffer commit];
    [[MTLCaptureManager sharedCaptureManager] stopCapture];
}
捕获管理器仅捕获捕获开始后创建的MTLCommandBuffer对象中的命令,并在捕获停止之前提交。
Capture a Custom Scope - 捕获自定义范围
要定义MTLCaptureScope的边界,请在要捕获的命令之前和之后调用beginScope和endScope方法。 要开始捕获特定捕获范围的命令,请调用startCaptureWithScope:方法。 当您的应用程序到达给定捕获范围的相应endScope方法时,捕获将停止。
- (void)setupProgrammaticCaptureScope
{
    myCapture = [[MTLCaptureManager sharedCaptureManager] newCaptureScopeWithDevice:device];
    myCapture.label = @"My Capture Scope";
}

- (void)triggerProgrammaticCaptureScope
{
    [[MTLCaptureManager sharedCaptureManager] startCaptureWithScope:myCapture];
}

- (void)runMetalCommands
{
    [myCapture beginScope];
    id<MTLCommandBuffer> commandBuffer = [_commandQueue commandBuffer];
    // Do Metal work
    [commandBuffer commit];
    [myCapture endScope];
}
捕获范围仅捕获在范围开始之后创建的MTLCommandBuffer对象中的命令,并在范围结束之前提交。
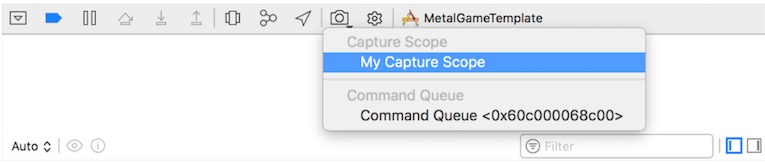
要从调试栏捕获自定义范围:
- 在Metal代码中,使用MTLCaptureManager和MTLCaptureScope实现自定义捕获范围。
- 在Xcode中,在物理设备上运行Metal应用程序。
- 在调试栏中,单击并按住Capture GPU Frame按钮。
- 从Capture Scope上下文菜单中,选择自定义捕获范围。
Performing a GPU Capture from a Breakpoint - 从断点执行GPU捕获
使用Xcode的断点操作在应用程序的断点处执行自动GPU捕获。当您的应用程序到达代码中的特定行时,Xcode可以自动执行GPU捕获,这允许您在断点处捕获应用程序GPU状态的快照。
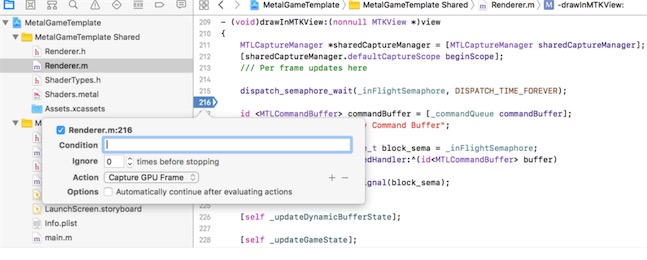
要为断点设置GPU捕获:
- 在代码中添加断点。
- 按住Control键并单击断点,然后选择Edit Breakpoint以打开GPU Capture对话框。
- 单击“添加”按钮(+),然后从Action菜单中选择Capture GPU Frame。
现在,当调试器到达断点时,Xcode会自动执行GPU捕获。